
 Garlic has been in use since the beginning of recorded history and was found in Egyptian pyramids and ancient Greek temples.
  Many cultures never in contact with each other came to the same conclusion that garlic had a place in the treatment of diseases and the maintenance of good health. We take that history to heart at Red Wiggler!
Last week we spent a few days separating the seed garlic bulbs into their individual cloves, leaving as much paper intact as possible. Then the cloves got a soaking overnight in a water bath containing kelp (yup, that’s seaweed) and baking soda. This loosened the clove skins. Early Tuesday, the cloves were drained and covered in rubbing alcohol which will kill any mites hiding between the thin wrappers. Drained again, they are finally ready to pop into the soil.
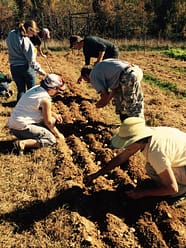
The garlic beds were prepared by removing the black plastic that had covered the soil for the pepper plants this summer, then mixing a layer of compost into the soil. The garlic cloves are planted with their pointed ends up. In one of the beds, the garlic was treated with an inoculant as part of an  experiment to encourage the growth of beneficial fungi on the garlic roots in order to increase the plants’ nutrient uptake and tolerance of various environmental stresses.
All the garlic beds are mulched with at least a foot of straw. The goal is to get the garlic to grow roots before the deep winter arrives, but not to make top growth until after the worst of the winter is over. The garlic roots will grow whenever the ground is not frozen, and the tops will grow whenever the temperature is above 40°F.
After the garlic is all tucked into the beds, we try to forget about the treasure planted out in the field. On a field walk next March or April, Andrea and the growers will peek under the straw mulch and see that the garlic tips have emerged. There will be much joyful garlic gawking, and planning for the next steps of garlic care.
– Katie Junghans, Volunteer Coordinator at RWCF
How to Roast Garlic (or how to add garlic to anything and everything)
Roasted garlic is fabulous in almost every savory dish. Add it to hummus, mash it into your mashed potatoes, spread it on toast and top with veggies and a fried egg, stir it into mac n’ cheese, bathe your cabbage in it, mixed with olive oil, and roast, use it as a topping for a home made pizza, blend it into a salad dressing. There really is no end to the things you can do with it. Here’s how it’s done:
1. Find yourself a big, beautiful, locally grown bulb of garlic. (Or do a few at once, the garlic will refrigerated for up to 2 weeks and freeze for up to 3 months.)
2. With your fingers, peel away all the loose, papery outer layers around the head of the garlic. Leave the head itself intact with all the cloves connected.
3. Trim about 1/4 inch off the top of the head of garlic to expose the tops of the garlic cloves. Drizzle 1 to 2 teaspoons of olive oil over the exposed surface of the garlic, letting the oil seep down into the cloves.
4. Wrap the garlic aluminum foil and roast in the oven for 30 minutes or so at 400 degrees.
5. After about 25 minutes, begin checking the garlic. The bulb is done when the center clove is completely soft when pierced with a paring knife.
6. Let the garlic cool slightly.
7. Press on the bottom of the clove to push it out of it’s paper and enjoy!